

First up is some new wall art I made for our hall. I chose this verse because it's one of my favorites, and it's part of the 50 Promises memory verse cards that I love so much. I'll guide you how I made mine, but the options are really endless. Want a different size wood? Different paint colors? A completely different font? Go for it!
Here's what you need:
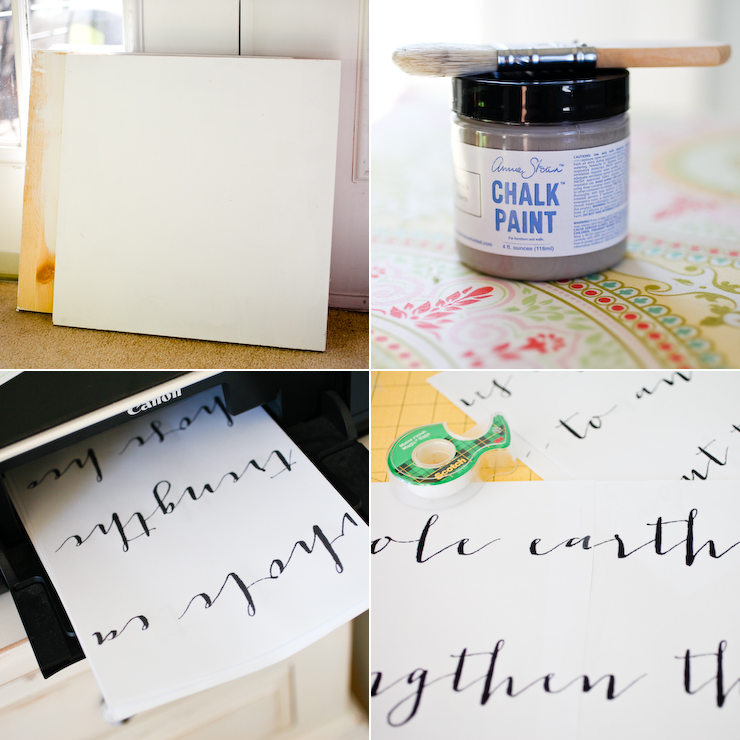
2 square pieces of plywood - mine measure 16" x 16" each
Paint - I used Annie Sloan chalk paint, but any paint that covers wood well will work great
Paint brushes
Printer
Tape
Scissors
Pencil
Hanging kit
1. First, pick out some pieces of plywood. If you're like me, you only had to go as far as your garage to find some lying around. Any thickness will do - these measure about 1/2 inch thick.
2. I adore this Annie Sloan chalk paint that was given to me. It goes on in one easy coat and dries fast. I used French Linen to paint the wood, and used Old White for the lettering. Start by painting a coat or two to cover your wood. That way it'll have time to dry as you work on your lettering.
3. Next, I used Photoshop to plan out my lettering (see below). I created a canvas the same size as my two pieces of wood (16" wide by 32" tall) and typed out my verse. The font I used for this is called Jacques and Gilles and can be purchased on Etsy here. It's a casual calligraphy font that I adore, and I wish my handwriting looked just like it. However, if you're looking for a free font (and there are plenty), I love dafont.com.
4. Once you are happy with your layout, print out your words. It took about 9 pages to print mine out. Once printed, cut and tape so it's in two big pieces - one for each board.


5. Once the pieces are taped together, you should be able to see how it will look on your sign.
6. Flip over both pieces and use the edge of a pencil to shade over the back of each and every word. This is tedious, I'll admit.
7. Make sure every word is shaded. Seriously tedious, but worth it.
8. Now flip over your lettering onto the boards (tape it down if you'd like) and, using a mechanical pencil without any lead in it, trace over each word.

10. Now, using a very fine tip brush, paint over your pencil lines. I think it's easiest to just paint over your lines, then go back and look at your original text and fill in the curves and lines you may have missed the first time. This takes some patience, for sure, but if you go slowly and methodically, you'll do great! I'd highly recommend using a handwriting style font as it's a lot more forgiving than a more rigid typewriter style font.
11. Let the whole thing dry overnight, then if you want to rough it up a bit with a sander, go for it. I sanded the edges as well as the front in a few places. Less is more.
12. Attach a hanging kit to each board and hang on your wall. You're done!

I hope you try it! And if you have questions along the way, please leave them in the comments section so that I can answer them there for people who may have the same question.
LOVE THIS PROJECT!!! :)
ReplyDeleteOn a note completely unrelated, have you read this blog?: http://ashleyannphotography.com/blog/ today's post made me think of you. I know you may be taking a break from blogs right now, but just wanted to share :)
YES! Love her blog (and miss it!). I'll have to take a look. :)
DeleteI would love to make something like that! Such a great idea for a personal way to decorate!
ReplyDeleteBeautiful project! You are so productive for a new mummy! Well done!
ReplyDeleteWhitney!!! This is amaaaazing! I am going to blog about this. I cannot wait. :)
ReplyDeleteI love the verse you picked and love the way you've featured it. What a great project!
ReplyDeleteLove this & the idea of doing the pencil shading/tracing stuff.
ReplyDeleteCan't wait to make something similar!
xoxo
You did great work, i appreciate your work. you have chosen attractive fond for this canvas print. nice to see these incredible DIY canvas. I want to try it shortly. Many thanks for sharing this easy tutorial for making it.
ReplyDeleteyourwallart.co.uk
The conversion of data styles is feasible with the system of iTunes application. http://itunesappdownload.com with the Android system. As well as therefore.
ReplyDeleteActually been obstructed, simply no tasks at that Aesop Frontline Sign in when you cancel a job, be sure to cancel tasks.
ReplyDelete